Step‑By‑Step Guide to Set Up OpenClaw (June 2026)
for recurring “do this for me every day” tasks
I promised a friend I’d write a hold-your-hand setup guide for non-technical people for OpenClaw so they can get an agent to run recurring scheduled tasks for them — things like sending a morning update about what’s going on in their life, or doing a daily web‑scraping research on something that matters to them. This is that (very belated) promise finally fulfilled. The idea is that this guide should feel like me literally sitting beside you, walking you through each step and telling you what to click and what to type.
Mindset Prep
If you're not comfortable with the terminal or command line yet, don’t psych yourself out. For this guide, just treat the Terminal like a very simple notepad where you type (or paste) one line at a time and press Enter. You don’t need to “understand Linux” to follow along – you just need to be willing to copy a few commands. This way of working is going to feel more and more normal over the next few years anyway, so consider this a gentle first rep.
0. Local vs cloud (where to run OpenClaw)
The first thing to decide is whether to set up OpenClaw on a local machine (your own laptop/desktop) or in the cloud (a remote server). Read my article for a deeper breakdown: Local or Cloud Deployment?.
Very short version of the trade‑offs:
| Local machine | Cloud server | |
|---|---|---|
| Uptime | Depends on whether your computer is awake or off/sleeping | Naturally 24/7 as long as the server is running |
| Models | Easier to run bigger local models (via Ollama, etc.) | Typically use remote/API models; large models cost more |
| Data privacy | Data can stay entirely on your own machine | Data goes through a remote machine; depends on your threat model |
| Ease | Native UI usually more intuitive to work with, but not easy to work from anywhere | Accessible from anywhere, but mostly by SSH and terminal without UI. |
The rest of this guide works for both local and cloud. There are just a few extra notes for local Windows users.
0.1 Windows OS local machine (Skip for Linux/macOS)
This is my actual setup:
- Windows machine
- Using WSL2 (Windows Subsystem for Linux)
- Running everything inside that Linux environment
If you’re on Linux or macOS, you can skip this section completely and jump straight to Section 1. Your native terminal behaves the same as the WSL terminal for what we’re doing.
On Windows, WSL2 makes life much easier for dev / infra stuff like OpenClaw. You don’t have to fight Windows‑specific oddities; you just work “as if” you’re on Linux.
Install WSL2 (Windows only)
-
Open Windows PowerShell as Administrator
- Start → typepowershell→ right‑click → “Run as administrator” -
Install WSL with Ubuntu:
wsl --install -d Ubuntu -
Restart your computer when prompted.
-
After restart, Windows will set things up and open a Linux shell the first time. It will ask you to choose a username and password. These are for your Linux user inside WSL.
Memory Allocation of WSL2
By default, WSL2 can grow to use up to about half of your system RAM — so if your machine has 32GB, WSL is allowed to go up to around 16GB when needed. I personally allocate 24GB out of 32GB to WSL so I can fit more local models comfortably.
To change the RAM limit for WSL:
- In Windows, open Notepad and paste something like:
[wsl2]
memory=24GB
processors=4
swap=4GB- Save this file as
.wslconfigin your Windows home folder, for example:
C:\Users\<YourName>\.wslconfigMake sure it’s not saved as .wslconfig.txt (turn on “File name extensions” in Explorer if needed).
- Open PowerShell as Administrator and run:
wsl --shutdownThis stops all WSL instances so the new settings can take effect.
- Open your WSL terminal again (Start → type
WSL) and inside Linux run:
free -hto confirm the new memory limit. You can adjust the memory= value up or down later depending on how much RAM you want to reserve for OpenClaw and your models versus the rest of Windows.
Important note for Windows - Opening the right terminal
In Windows set up, make sure you use the WSL terminal and not the native Windows Powershell terminal.
I usually open the terminal by pressing Start and type “WSL”, then Enter. Now, I pin the WSL terminal to my taskbar so I always open the correct terminal.
From here on, all commands in this guide assume you are inside that WSL terminal.
1. Inside Linux (WSL / macOS / native Linux): basic prep
- On Windows: open WSL (
Startand type "WSL"). - On macOS: open Terminal (
Cmd+Spaceand type "Terminal"). - On Linux: open your usual terminal app.
1.1 Update packages
In your Linux/WSL terminal:
sudo apt update
sudo apt upgrade -y
(If you’re on macOS with Homebrew, this step is mainly for Ubuntu/Debian‑style systems; you can mostly just continue.)
2. Optional: Install Ollama first (free local models)
If you’d like to start completely free, you can run local models via Ollama first. That lets you try OpenClaw without paying for any API up front.
Rough flow:
- Install Ollama (Linux):
curl -fsSL https://ollama.com/install.sh | sh- Start Ollama:
ollama serve- In another terminal, pull a model — for example, a Gemma model (Google’s open‑source series):
ollama pull gemma2
# or another gemma variant from the Ollama docs
You can start with Ollama + Gemma‑style models for free and then later move to:
- Anthropic models (Claude Opus or Sonnet)
- GPT Codex 5.5
- MiniMax / DeepSeek
- Or an OpenRouter API key (single key, many models behind it)
3. Installing OpenClaw (one‑time)
When I first set up OpenClaw in April 2026, the official way was a curl script from openclaw.ai that bootstrapped everything. That still exists, but now there’s a cleaner path: installing OpenClaw directly via Node’s package manager (npm). That’s what we’ll use here.
3.1 Install Node.js via nvm
In your Linux/WSL terminal:
- Install
nvm(Node Version Manager):
curl -o- https://raw.githubusercontent.com/nvm-sh/nvm/v0.39.7/install.sh | bash- Reload your shell:
source ~/.bashrc # or `source ~/.profile` if that’s where nvm was added- Install a recent Node version (e.g. 24):
nvm install 24
nvm use 24
node -v
You should see v24.x.x or similar.
3.2 Install OpenClaw via npm
Now install the OpenClaw CLI globally:
npm install -g openclaw@latestCheck it:
openclaw --versionIf you see a version number, you’re good.
4. Run openclaw onboard (the setup wizard)
Next, you’ll run the interactive setup wizard. This is where you tell OpenClaw:
- Which model/provider to use (Ollama, Anthropic, OpenRouter, etc.)
- Which channel to talk to you on (Telegram, Discord, etc.)
- Some basic defaults and features
- Web search options such as Brave (if you want)
From your Linux/WSL terminal:
openclaw onboardThe wizard will ask you a series of questions. The goal here is to keep it simple:
- Pick QuickStart instead of Advanced.
- Start with either Ollama (free, local) or a basic API like OpenRouter.
- Connect at least one channel (Telegram or Discord).
- Optionally enable web search and paste in a Brave API key.
The next two sections will outline the steps to setup the channel and web search.
5. Channel: where the agent talks to you
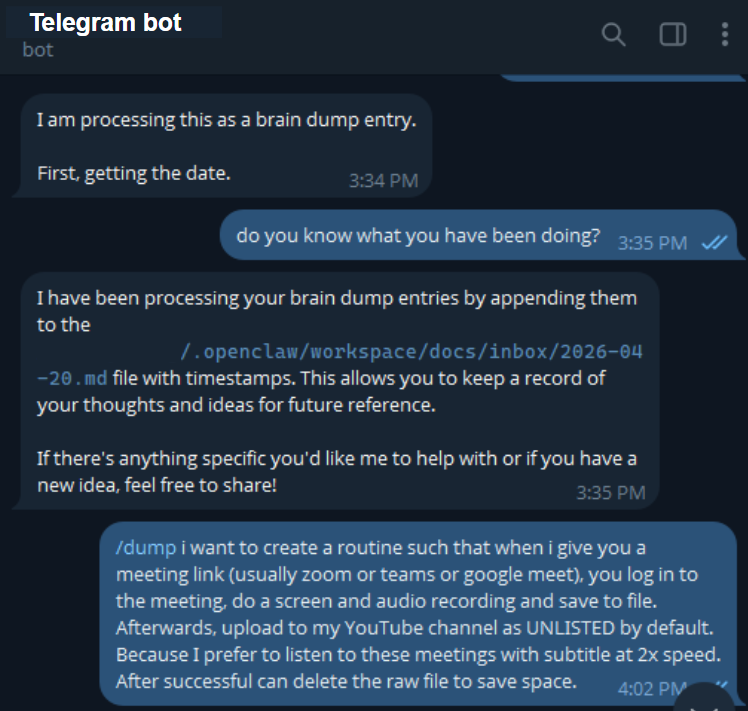
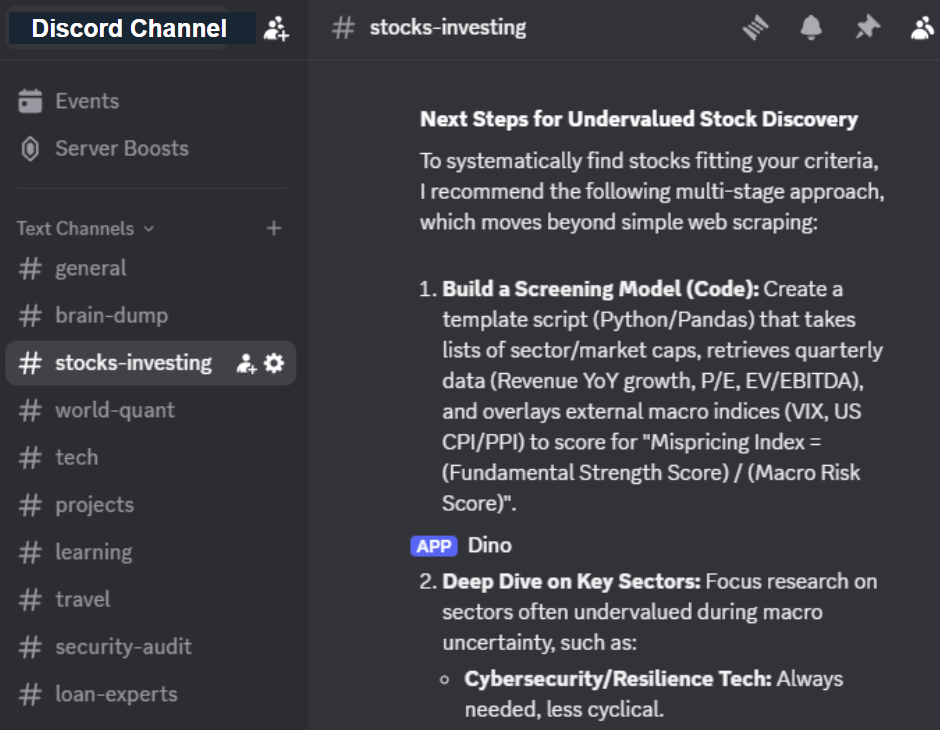
The wizard will ask which “channel” you want the agent to use. This is where its messages will show up. I recommend starting with Telegram first as it is the easiest to set up. Later on, you can also add a Discord channel to organize your work in different topics.
| Telegram (recommended for first‑time setup) | Discord (great for organizing info into topics) |
|---|---|
| Why use it: Very straightforward to set up, works well on phone and desktop. | Why use it: Lets you organize info into multiple channels (e.g. #daily-recap, #research, #experiments). |
| How to set up: 1. Open Telegram. 2. Search for @BotFather. 3. Start a chat and run /newbot. 4. Give the bot a name + username. 5. Copy the bot token 123456789:AA.... 6. Paste that token into the openclaw onboard wizard when it asks for Telegram credentials. |
How to set up: 1. Go to Discord Developer Portal. 2. Create a new application. 3. Add a bot to the application. 4. Copy the bot token. 5. Invite the bot to your server with proper permissions. 6. Paste that token into the openclaw onboard wizard when it asks for Discord credentials. |
| Where messages go: Directly into your Telegram chat with the bot (or into a group if you add the bot there). | Where messages go: Into specific channels in your Discord server (you can route different agents/jobs to different channels). |
 |
 |
If you’re just starting and don’t want to juggle too many things, start on the Telegram side of the table and add Discord later once you’re comfortable.
6. Web search (Brave) inside the wizard
During openclaw onboard, the wizard will reach a step about web search. This is where you can enable Brave Search so your agent can look things up on the internet as part of its jobs (e.g. daily research on a topic you care about).
If you choose Brave, you’ll be asked for an API key.
Here’s how to get it:
How to get a Brave Search API key (step‑by‑step)
- Open your browser and search for “Brave Search API”.
- Go to Brave’s official API page and create an account or sign in.
- In their dashboard, create a new API key (look for “New key” or “Create key”).
- Copy the API key string they give you.
- Go back to your terminal where
openclaw onboardis running. - When the wizard asks for a web search provider and key, choose Brave and paste the key.
Brave will typically mention a 5 USD credit. That’s credit, not an automatic 5 USD/month subscription. You don’t have to commit to a monthly plan just to test it; you can use the included credit first and then decide later whether it’s worth continuing.
If you’re not ready for web search yet, you can skip it during setup and add it later via configuration.
7. Core configuration files: AGENT, SOUL, USER, TOOLS
Once onboarding finishes, OpenClaw sets up a workspace directory with key files that define how your agents behave. Typically you’ll see:
AGENTS.mdSOUL.mdUSER.mdTOOLS.md(or atools/folder)
Here’s what each one is in plain language:
7.1 AGENTS.md — which agents exist and what they do
This is the roster and job description list:
- Each agent has a name.
- Each has a role (daily recap, research, planner, etc.).
- You can point each agent at different channels and tools.
For recurring scheduled tasks, you might define agents like:
- A “morning‑life‑update” agent that pulls from your tasks, notes, calendar.
- A “daily‑research” agent that scrapes websites and summarizes them.
7.2 SOUL.md — personality and style
This is the agent’s “soul”:
- How it speaks (tone, style)
- How it structures outputs (bullet points vs paragraphs, headings, sections)
- What it should focus on in its responses
For example, for a daily update agent, you might tell it to:
- Group updates by project or area of life.
- Highlight blockers and next actions.
- Keep things short and skimmable.
7.3 USER.md — who you are
USER.md explains you to the agent:
- Name, timezone, and context.
- What you do (work, side projects, habits).
- What kinds of updates you actually care about.
- Any preferences (update time, preferred channels, etc.).
The clearer this is, the less “training” you’ll need to do in chat.
7.4 TOOLS.md — what the agent can actually do
TOOLS.md (or a tools folder) is the capability list:
- Read local files or folders.
- Query APIs (Notion, Git, calendar, etc.).
- Scrape web pages or call external services.
- Run scripts or commands if you allow that.
You can chat with your agent and let your agent modify each of these files organically, but I recommend that you take a read at what is inside. It may help to refine the content with an LLM that you already regularly use (e.g. Germini or whatever you use on a regular basis).
8. Recurring tasks (“Cron jobs” in OpenClaw)
Recurring scheduled tasks (like “every morning at 8am, send me a life update” or “every evening, run this research scrape”) are called Cron jobs in OpenClaw. They can be:
- Defined in
.openclaw/cron/jobs.json - Managed in the default OpenClaw dashboard
Conceptually:
- A Cron job says: “On this schedule, run this agent with this configuration.”
- The agent then does its thing (fetch data, analyze, send messages).
By default you can:
- Define cron jobs in a
jobs.jsonfile inside your workspace. - View and manage them from the OpenClaw default dashboard (the UI it ships with).
Examples:
- Every day at 08:00, run a “morning‑life‑update” agent that:
- Reads your tasks, notes, and calendar
- Summarizes what’s going on
-
Sends it to you on Telegram or Discord
-
Every weekday at 21:00, run a “daily‑research” agent that:
- Scrapes a set of URLs or APIs
- Summarizes the key changes
- Posts into a specific Discord channel
Personally, I now manage all my cron jobs through a Mission Control dashboard I built in Node.js. It sits on top of OpenClaw, lets me see all jobs at a glance, and gives me one place to enable/disable or tweak them. I’ll share that system — and how it connects back into jobs.json and the agents — in another article.
I hope this guide helped you in some way in your first OpenClaw setup. If any of the steps were unclear to you, feel free to drop me an email at rpascale.org@gmail.com and I may refine this guide to make it more helpful to you.